The engineering officer is in charge of the ship's systems, energy utilisation and damage control. You'll be required to manage power and cooling for the weapons, shields and engines to provide the best performance for the situation in hand and direct damage control crews to repair damaged systems. This station has a lot of tunable parameters to manage but with the use of presets and the ability to let damage control teams operate autonomously, the ship's engineer can prove decisive in a fight without suffering from information overload.
The engineer's station can look immediately daunting with a lot of information and controls but it is easily tamed and can provide a critical edge in a fight and extend the longevity and effectiveness of the ship as a whole. The engineer's station looks like this:
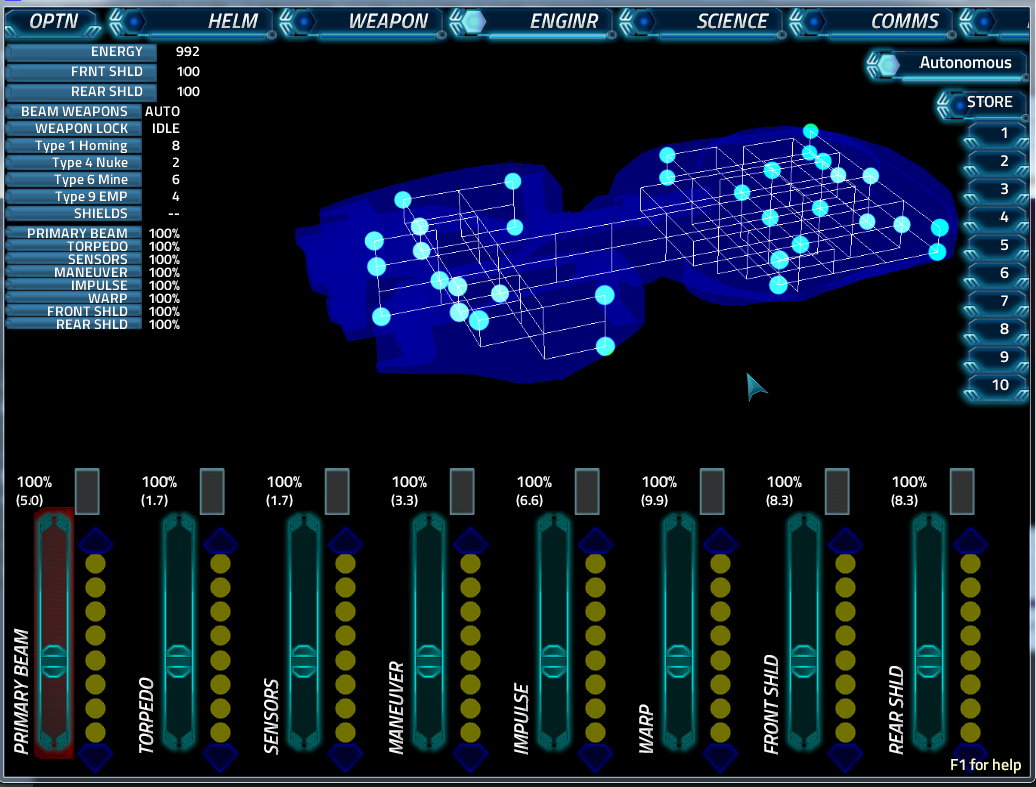
In the top left is a readout of the status of the various ship's systems. It shows the amount of energy the ship has, the current shield strengths, details on weapons and ordnance stocks, whether or not the shields are active and then the overall status of each of the systems which will be degraded by damage.
The centre of the screen shows an overview of the damage to the ship's systems. Each white/blue blob represents a system component, and leaving the mouse pointer over one of them will show what it is. When damaged, the blob will turn red and it must be repaired to restore its function. The white flashing diamonds you will see on this screen represent your damage control (or 'DamCon') teams, which move around the ship repairing damaged systems. While the 'Autonomous' button in the top-right of the screen is selected, these teams will move around automatically repairing damage, otherwise they can be selected by tapping them and then directed to a damaged node by subsequently tapping it. The white lines represent the corridors between sections of the ship; these can also be damaged preventing damage control teams from traversing them. If a damage control team is in an area that takes damage they will take casualties, reducing the speed at which they can repair systems. Damage control teams can be replenished by docking at space stations.
At the bottom of the screen are the controls which affect the power devoted to each system and the coolant levels supplied to them. For each system, the slider on the left sets the power level (0-300%) and the control on the right sets the amount of coolant for that system. The ship has 8 units of coolant that must be shared across all systems; when all units of coolant are allocated you will need to remove a unit from one system to apply it to another. Systems running over 100% power will require coolant to prevent them from overheating, the bar at the top of each system's controls shows the current heat level. If the heat level reaches the top of the bar the system will overheat and take damage, preventing it from functioning until a damage control team can repair it. The following table shows roughly how many units of coolant are required to keep a system cool for a given level of over-powering:
| 0 | 2 | 4 | 6 | 8 |
| 100% | 150% | 190% | 220% | 250% |
Source: http://artemiswiki.pbworks.com/w/page/39352367/Engineering
Powering systems depletes the ship's energy reserves so dropping power to an unused system can conserve energy, in fact if the ship's energy reserves are completely depleted, dropping all systems' power to zero will allow the ship to slowly recover a small amount of energy from background radiation, however this will leave you immobile and completely defenceless, not at tactic to be used while enemies are nearby. When in transit, for example, it's useful to drop the shields to save energy although it's not advisable to drop energy away from them completely if they are not fully charged. Similarly dropping power to the warp drive when it's not in use will slow the ship's energy drain, just remember you'll need to be able to rapidly restore power to powered-down systems when they're needed. The following table shows the effect of power to each of the systems:
| System | Primary Beam | Torpedo | Sensors | Maneuver | Impulse | Warp | Jump Drive | Front Shield | Rear Shield |
| Function when powered | Affects beam cooldown rate. | Affects tube reload speed. |
Affects science scanning speed. |
Affects turning rate. | Affects impulse speed. | Affects warp speed. |
Affects jump warm-up and system recovery time. |
Affects shield effectiveness and recharge rate. | Affects shield effectiveness and recharge rate. |
| No Power | Beams will not fire. | Tubes cannot be loaded, fired, or unloaded. |
Long Range Sensors screens are unavailable. |
Ship cannot turn. | Ship cannot use impulse. | Ship cannot use warp. | A jump requires 30 seconds to warm up. | Front shield cannot be raised. | Rear shield cannot be raised. |
| Energy Drain Factor | x3 | x1 | x1 | x2 | x4 | x6 | x6 | x5 | x5 |
Source: http://artemiswiki.pbworks.com/w/page/39352367/Engineering
Remember - systems use energy whenever they have power regardless of whether they're in use. It's best to drop power to systems that aren't being used.
Finally, on the right of the screen is a bank of presets - pressing 'Store' and then a number will store the current power and coolant levels for later recall. For example, if you had settings with more power to warp engines and low power to shields for transit, you could store them in preset 1 and then when you needed transit settings again, pressing '1' would set the power and coolant levels to those you had previously set.